Design Apps
- Use industry-standard graphic design applications for best compatibility.
- Recommended applications:
- Adobe Illustrator (for PDF templates)
- Adobe Photoshop (for PSD templates)
- Corel Draw (for CDR templates)
- Designs from other applications should be submitted in JPEG format to ensure consistency.
Design Checklist
- Design on the “Artwork” layer or create a new layer above the template.
- Once you’ve finalized the design, remove all template layers, leaving only your artwork.
- Flatten all gradients and transparencies and outline all text.
- Ensure that all template layers are deleted.
- Upload file is a single page PDF or JPG file @ 150dpi.
Print-ready Checklist
- PDF Files: Must be flattened and all text outlined.
- Submit files as a Flattened PDF (Single Page) or JPEG only, without crop marks or bleed.
- For custom-sized products, ensure your graphic matches the product dimensions exactly.
- For template-based products, the dimensions must match the provided template exactly, not just the graphic area.
- Use CMYK color mode; Pantone or RGB colors may lead to inaccuracies.
- Submit files at 150 DPI, with a maximum file size of 300 MB. Graphics over 200″ can be scaled accordingly.
Frequently asked questions
to help prepare Print-Ready Files
Bleeds & Crop Marks
In printing terminology, the bleed is the extra margin on a print product that is meant to be trimmed off when the product is trimmed to its final size. Bleed basically means that the color and graphics on a product “bleed off the page” to ensure continuity of the color to the edge of your product. For the best results, please download the product templates from our download templates page.
When we print products such as business cards and postcards, we do not print on paper of that size. We gang-run print, which means that we organize several print jobs next to one another on a large sheet of paper, print, and then trim each individual product to its final size. Jobs cannot be trimmed perfectly on the trimming line each time. During the trimming process, a product may be trimmed within or beyond the trimming line. As a result, the product may have a white edge, or a portion of the artwork from the surrounding jobs. Thus, we require a bleed on each individual product so that when the product is trimmed, there is an extra margin to prevent imperfections.
A full bleed is required for all print-ready files. For the correct bleed for your product, please view the list below. For example, most business cards have a 0.1″ bleed, so a 2″ x 3.5″ business card without round corners will have a bleed size of 2.1″ x 3.6″.
0.1″ bleed: most business cards, folded business cards, bookmarks, CD packages, club flyers, collectors cards, DVD packages, event tickets, most postcards, rack cards, rip business cards, rolodex cards, stickers, table tents, greeting cards, “wink” special shapes.
0.125″ bleed: a-frame signs, banners, brochures, door hangers, envelopes, flyers, folded hang tags, hang tags, illumaprint panels, letterheads, mini menus, notepads, posters, Large Format Posters, roll labels, retractable banner stands, staggered cut flyers, window clings, window decals, yard signs.
0.125″ bleed: booklets, calendars, catalogs
0.3″ bleed: folders
0.325″ bleed: business cards with round corners in either 2” x 3.5” and 3.35” x 2.17” size. Postcards with round corners in the following sizes: 4” x 6”, 5.5” x 8.5”, 4.25” x 5.5”, 5” x 7”. All special shapes, except for “wink” special shape, which is 0.1″.
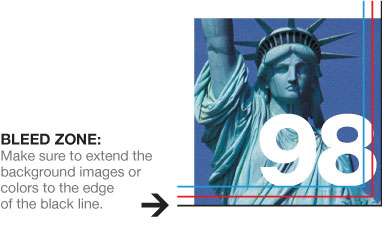
Crop marks are lines on the design that serve as a guide for where the image or product will be cropped. Your submitted file should not have any guidelines, if they do, they will come out in the finish product.
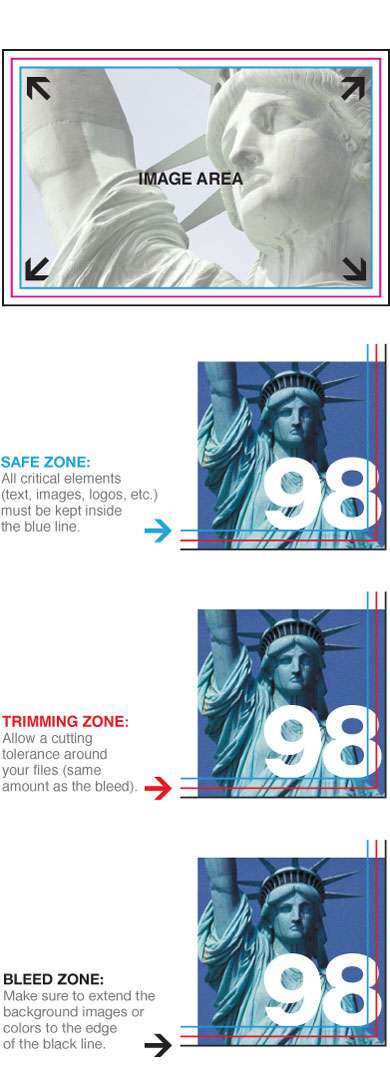
It is helpful to use guidelines in your artwork for print-ready files. Guidelines such as the safe zone, the trimming zone, and the bleed help designate where your product will be trimmed, as well as help you keep important elements such as text and graphics away from the trimming margin. Please provide us with a bleed all around your artwork, and make sure to keep all critical elements such as text and graphics within the Safe Zone.
Borders are not recommended due to cutting shifts. If your product is not trimmed exactly on the trimming line, borders may appear uneven. Especially for small products such as business cards, even half a millimeter of cutting shift may cause the borders to look uneven.
File Formats & Size
Bitmap means a map of bits (or pixels) that form a picture. Thus, a bitmapped image is an image comprised of pixels. Though bitmaps store images in high resolution, they do not rescale very well, and tend to appear jagged when zoomed in, and blurry when reduced in size. Bitmaps are ideal for storing digital images. Whereas a bitmapped image will lose clarity when rescaled, a vector graphic can be scaled indefinitely without losing clarity.
The example below shows the effect of a bitmap graphic versus a vector graphic. When zoomed in, the bitmapped image appears jagged, whereas the vector graphic appears clear and crisp.
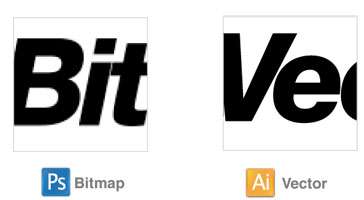
A vector image is an image made up of lines and curves that are stored as mathematical formulas, and can be moved freely or modified without losing detail or clarity. Whereas a bitmapped image will lose clarity when rescaled, the vector graphic can be scaled indefinitely without losing clarity.
The example below shows the effect of a bitmap graphic versus the vector graphic. When zoomed in, the bitmapped image appears jagged, whereas the vector graphic appears clear and crisp.
Maximum file size for uploads: 200MB (megabytes) per file.
Before uploading your file, make sure to check the image size. In Photoshop, click on Image > Image Size, and proportion your image correctly.
Recommended: To reduce file size, please upload in .jpg format. For all other file formats, ensure all layers are flattened.
If you need to send us a file larger than 200mb, please use a File Sharing Service such as Wetransffer.com
Resolution
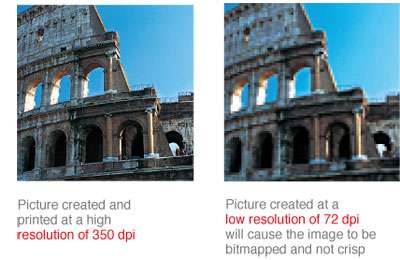
LPI, or lines per inch, is a measurement of resolution that uses a halftone screen. LPI measures how close together the lines are in this halftone grid. The higher the lines per inch (or the closer the lines are together), the better and clearer the image will be. In order to determine the appropriate image resolution needed for print, the combination of your printer’s DPI and the required LPI must be observed. Whereas the DPI determines the number of dots per inch, the LPI is also needed in order to determine the frequency of the lines containing the dots, per inch of the halftone grid. Once these two elements are calculated, the correct resolution can be determined. The image usually must have 1.5 to 2 times as many dots per inch as lines per inch.
Typefaces & Fonts
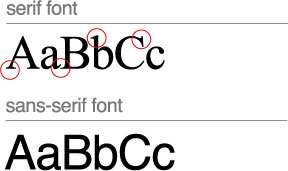 Serif and Sans-serif are typefaces that are commonly used for body text. Serifs are the smaller lines on the main strokes of letters and numbers. The structure of the serifs is considered less harsh for reading large body of text, which is why newspapers and books often use this type of typeface.
A typeface without serifs is called Sans-serif (the word “sans” is French for “without”). Sans-serif typefaces are commonly used for electronic media. Since the computer screen has lower resolution compared to printed material, Sans-serif fonts are easier to read and follow than Serif fonts.
Please follow the following steps before you submit your files.
a. Fonts must be embedded in PDF files. (Some fonts have copyright restrictions and will not embed in PDF Files.)
b. Embed all images and outline text in Illustrator files.
c. Flatten all layers when working in Photoshop.
When creating a file with a vector-based software such as Illustrator, follow these steps to outline fonts:
1. Select “Type”
2. Select “Create Outlines”
When trying to outline fonts in Photoshop, simply just flatten the image.
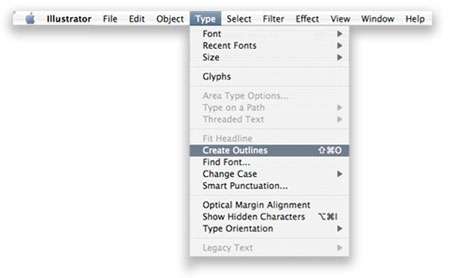
Embedding a font means storing your font information in the file so that when your file is opened on a different computer, the fonts do not vary in appearance. If your fonts are not embedded, a different font may be substituted for your document. To prevent these variations, embed all your fonts in PDF files. Alternatively you may also Outline all text in file.
Colors & Color Mode
We require that you provide us with print-ready digital files in CMYK or RGB color mode depending on the product type. Provide all black and white artwork in grayscale color mode. We do not accept any other color mode.
CMYK indicates Cyan, Magenta, Yellow, and Keyline (Black). These 4 colors of ink are used for offset printing. Cyan is a shade of blue found in the 4 primary color printing process. Magenta is a shade of hot pink found in the basic 4 color printing process.
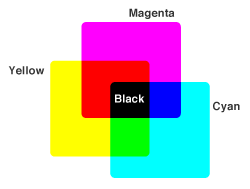
RGB color mode combines three colors, Red, Green, and Blue. Your computer monitor, scanner, and digital camera all use a combination of these three colors to produce the final colors. Presses, however, require four different colors, CMYK, to produce the final printed material. Thus, RGB must be converted to CMYK for print.
You can convert a file from RGB to CMYK, but cannot convert a file from CMYK to RGB. If you attempt to do so, some of the image data in that file may be lost and become unrecoverable.
Keep in mind that your image may be created in RGB, but it will print in CMYK.
RGB color mode may look sharp on your computer screen, however, it will not print as it appears.
Convert RGB files into CMYK in Photoshop by simply clicking on Image > Mode > CMYK.
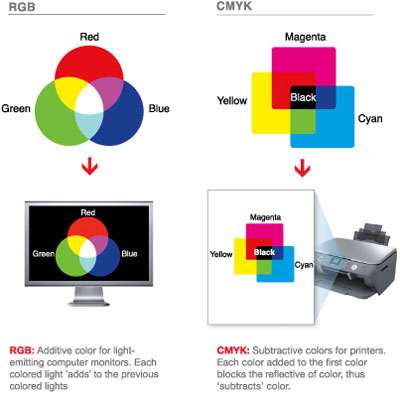
It is imperative that you convert your files to CMYK, since this is the only color mode that we accept for printing. Any other color mode will not produce optimal printing results. Most commercial printers accept RGB images, however, using images that are in RGB color mode may ruin the appearance of the final printed material.